Materials Monday: Silk Ribbon


Today I'm talking about Silk Ribbon. Looking at this picture, can you tell the difference between the silk ribbons?
Are you shaking your head wondering what I'm talking about? It may all look similar but there are definite differences in these- and I want you to learn what they are and give you examples on how to use each.


Silk ribbon from Marsha Neal's Etsy shop or website is all hand-dyed. Marsha's supplier is a talented friend who hand-dies each ribbon in every color imaginable.  They come in strands typically 40-42 inches long, which is a nice generous length when used in beading projects!


Here are the basic sizes of ribbon. The 2mm silk is more like a cording, round in shape, and fairly narrow. This would be good for stringing beads with medium sized holes but could need a bit of coaxing.
The Fairy ribbon has a different texture. The edges are all hand-stitched, and the ribbon is almost transparent- a lightweight option to use with wire working, cording ends, fold over ends, etc.
The Silky ribbon is the widest of the three. It also has hand-stitched edges.  A more opaque ribbon, with a deeper color and just as versatile as the other two! You can use it on it's own or pair with a beaded strand, finish the ends with ribbon ends or wrapped wire.

example using fairy ribbon


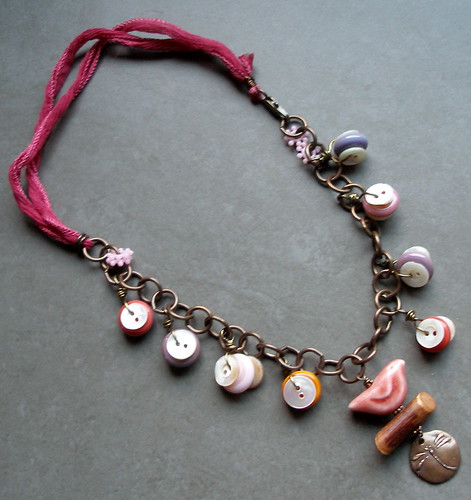
 example using 2mm silk cording


P1011520
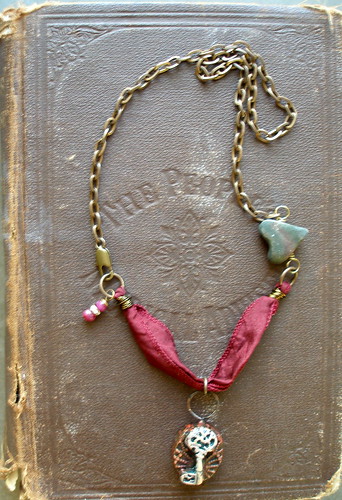
example with Silky ribbon


Here's a small sampling of some of the colors that the silk comes in.


And that isn't even the HALF of it!


You can purchase groupings of ribbons from Marsha's sites in varying colors. It's a nice way to stock up on that cool component that works for many different designs.

Tune back in on Saturday for Silk Ribbon Giveaway, 
only here at A Jewelry Accord!

Thank you Marsha for the use of your photographs for this post!

Designer Spotlight: Andrew Thornton

 This week's featured designer is Andrew Thornton.  
Andrew is just getting back from the Tucson Gem and Mineral Show this year! You can read about all the things he did while he was there on his blog. Some day we will join you there, Andrew!

Andrew Thornton is a professional fine artist who left behind the hustle and bustle of New York City for rural Pennsylvania. His work can be seen in private collections around the globe. Andrew works part time with his family at Green Girl Studios and teaches across the country. He is also a regular contributor to jewelry-related periodicals and publications.  To find out more, check out his blog:  http://andrew-thornton.blogspot.com/
We asked Andrew a few questions about working with cording and fibers in his jewelry and here's what he had to say!

What's your favorite type of cording or fiber to work with in jewelry?
Andrew:  I adore re purposing materials with a history and giving them new life as pieces of fine art jewelry; I especially enjoy using antique kimono fabric, tatted lacework, vintage sari fabrics, and old silk ribbons.  Part of the fun of using them is the finding of them.

Why do you like working with cords and fibers in your designs?  What quality draws you to these materials?
Andrew:  One of my loves is mythology and folklore.  Every culture on this planet has at one time or another made cloth or worked with fibers.  As a result, there are very specific myths, legends and stories associated with the making and using of fabric.  I like the idea of connecting to these old ideas.  Not only are they touchstones to traditions and history, but fibers are also flexible, colorful, sturdy and can easily add texture, which makes it an ideal material for jewelry-making.
Thanks so much, Andrew!

And the winner is...

The randomly selected number from the number generator was...#19!

That means Elisabeth of Beads For Busy Gals, you are the winner! You were the 19th commenter!

Congratulations, Elisabeth!!!
 Please email me your mailing address and I'll get your package right out to you. You can find my email in my profile. Thank you and happy beading with your new cord!

Technique Tuesday: Knotting 101

Here's a short review of some of the basic knots we will be covering in our upcoming book! We will be going much more in depth with these knotting techniques later, but this will help get you started!

 Overhand Knot
 The golden overhand knot! This is your basic knot. It's great for tying in between beads and holding them securely on a cord or use it to finish off the cord. It can be tied with one or more cords. It can be functional as well as decorative!
Make a loop. Pass the cord behind the loop and then through the loop. Pull tight.

 Square Knot
This knot is great for tying two cords together and finishing off cords too.
Pass the right cord over the left cord and through the loop. Pull tight. Pass the left cord over the right cord and through the loop. Pull tight.


Lark's Head Knot
This knot is good for attaching cords to pendants, focal pieces or components.
Fold the cord in half. String the folded end of the cord through the hole in the pendant or focal piece. Pass the free ends of the cord through the cord loop. Pull tight.


Half-Hitch Knot
 This knot is for binding multiple cords together or to make a loop for a button or bead closure. It's also great for attaching beads to jewelry findings.
Start with an overhand knot or lark's head knot. Make a loop around the cords or finding and pass the cord through the loop. Pull tight.

Waxed Linen Giveaway!

We are doing another giveaway! This time I'm giving away a sampling of my favorite material waxed linen cord. This is the good stuff people, Irish Waxed Linen Thread from Belfast, Ireland! The best you can buy. This giveaway package includes 3 yards of 12 different colors pictured above. These are all from my personal stash that I use over and over. Just think of all the jewelry you could make with this! Plenty of cord to play around with to make fabulous necklaces, bracelets and even earrings! If you've ever wanted to try out waxed linen cord this is a great opportunity! Even if you just want to get an idea of some of the colors available, now is your chance! The picture below is for color reference only.
The giveaway sample pack includes 3 yards of the above colors! The colors are: (from left to right)

Williamsburg Blue, Teal, Plum Purple, Sage Green, 
Dark Forest Green, Country Red, Maroon, Orange Crush, 
Walnut Brown, Dark Chocolate Brown, Charcoal Grey and Black.

To enter the giveaway, leave a comment on this post by Wednesday, February, 9th 2011.
In your comment, please tell us what kind of information you are most looking forward to in our upcoming book? Wire techniques? Knotting techniques? Information about materials and findings? Or maybe you are looking forward to design ideas? Please let us know!

A winner will be chosen at random on Thursday, February, 10th 2011.
GOOD LUCK!


Search This Blog

Most Reading